Extract table data from images with pure Pytesseract
When extracting data from documents, one common challenge is processing text in images. This can be particularly difficult when the text is in tables. You don’t just want the text, but want it structured in relation to other text.
You can find solutions to this problem by Googling, but many seem brittle and overcomplicated. For example, they may be brittle because they rely on using image recognition libraries like OpenCV to find gridlines that might not always be present. And they may be overcomplicated because can’t OCR tools like Tesseract alone return information needed to reconstruct table data from provided attributes?
That was my hypothesis, anyway. Since Tesseract gives you information on x and y coordinates of text, and since tables follow a fairly standard format, I thought that we should be able to extract table text and structure using only Tesseract.
So I tested the idea.
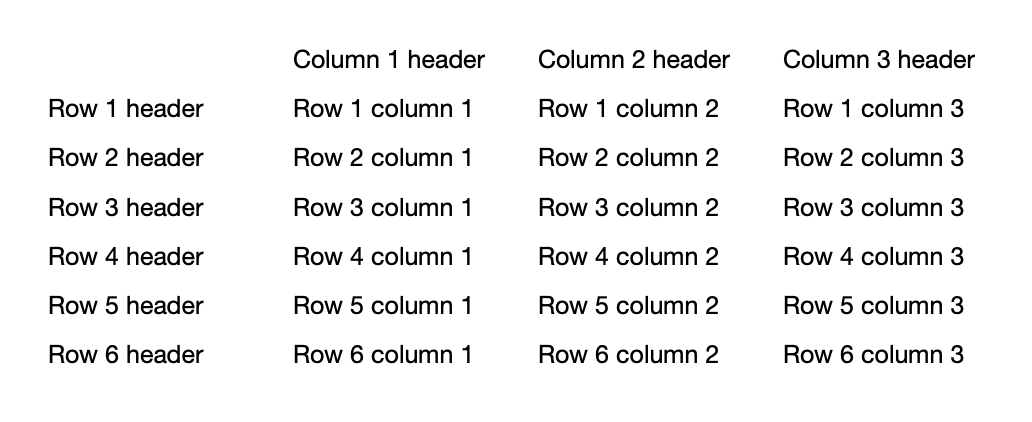
The toy problem: A simple table in an image
To test my hypothesis, I created a very simple toy problem using this table in an image:
The code
Using this toy problem, here’s how I approached a solution, step by step.
1. Import key libraries
I was hoping to use the fewest libraries possible, in keeping with my goal of simplicity. But I ended up having to import several, shown below.
Importantly, note the use of Pytesseract. This is a Python wrapper around Tesseract, which you’ll need to install. See the instructions for doing so by following that link.
import cv2
import numpy as np
from PIL import Image
import pandas as pd
import pytesseract
from sklearn.cluster import AgglomerativeClustering
2. Create a function to preprocess the image
Tesseract works better when you do even basic preprocessing on images. I wrote a function to handle that. Note that it explicitly strips out gridlines, which some other image table extractors I’ve seen need in order to determine rows and columns, as mentioned above.
def preprocess(image_path: str) -> np.ndarray:

    # Get the image.
    img = cv2.imread(image_path)

    # Convert the image to grayscale.
    gray_img = cv2.cvtColor(img, cv2.COLOR_BGR2GRAY)

    # Remove backgrounds.
    bg_free_img = cv2.threshold(gray_img, 0, 255, cv2.THRESH_OTSU)[1]

    # Create an inverse image to use for removing lines.
    inverted_img = ~ bg_free_img

    # Remove horizontal lines.
    # TODO: Set line thickness dynamically.
    horizontal_kernel = cv2.getStructuringElement(cv2.MORPH_RECT, (40, 1))
    remove_horizontal = cv2.morphologyEx(inverted_img, cv2.MORPH_OPEN, horizontal_kernel, iterations=2)
    cnts = cv2.findContours(remove_horizontal, cv2.RETR_EXTERNAL, cv2.CHAIN_APPROX_SIMPLE)
    cnts = cnts[0] if len(cnts) == 2 else cnts[1]
    for c in cnts: cv2.drawContours(bg_free_img, [c], -1, (255, 255, 255), 2)

    # Remove vertical lines.
    # TODO: Set line thickness dynamically.
    vertical_kernel = cv2.getStructuringElement(cv2.MORPH_RECT, (1,40))
    remove_vertical = cv2.morphologyEx(inverted_img, cv2.MORPH_OPEN, vertical_kernel, iterations=2)
    cnts = cv2.findContours(remove_vertical, cv2.RETR_EXTERNAL, cv2.CHAIN_APPROX_SIMPLE)
    cnts = cnts[0] if len(cnts) == 2 else cnts[1]
    for c in cnts: cv2.drawContours(bg_free_img, [c], -1, (255, 255, 255), 2)

    # Return the output image.
    return bg_free_img
3. Create a function to group text by inferred row
Tesseract isn’t so helpful as to return information on text’s row in a table. It doesn’t have a concept of table or row. It does tell you, however, text’s “top” value, which is effectively its y coordinate. Using this, we can cluster text into distinct rows.
def get_row_max_tops(img_df: pd.DataFrame, distance_threshold: float) -> list:

    # Create coordinates to use for clustering top values for rows. Note that
    # we use (0, y), where why is "top." We specify 0 for x because we don't
    # care here about the left value, only the top value.
    row_coordinates = [(0, row["top"]) for _, row in img_df.iterrows()]

    # Cluster rows by top values.
    row_clusters = AgglomerativeClustering(
        n_clusters=None,
        affinity="manhattan",
        linkage="complete",
        distance_threshold=distance_threshold)
    row_clusters.fit(row_coordinates)

    # Create max row tops values using row clusters and sort ascending.
    row_max_tops = []
    for row_index in np.unique(row_clusters.labels_):
        row_coordinate_indexes = np.where(row_clusters.labels_ == row_index)[0]
        row_max_top = max([row_coordinates[row_coordinate_index][1] for row_coordinate_index in row_coordinate_indexes])
        row_max_tops.append(row_max_top)
    row_max_tops.sort()

    # Return the row index and max top for each row.
    return [(i, row_max_top) for i, row_max_top in enumerate(row_max_tops)]
4. Extract table data from the preprocessed image using table row clusters
With the functions above to preprocess an image and cluster text by row, we’re ready to rock. The last function we need does the following:
- Preprocess the image
- Cluster text into rows
- Use Tesseract’s “left” and “word_num” attributes to sort text into appropriate columns
- Return everything as a dataframe
def read(image_path: str, distance_threshold=25.0) -> pd.DataFrame:

    # Preprocess the image.
    img = preprocess(image_path)

    # Read the image into a Pytesseract data frame.
    img_df = pytesseract.image_to_data(img, output_type="data.frame")

    # Drop any blank text.
    img_df.dropna(inplace=True)

    # Add row numbers to the dataframe. We do this by clustering rows according
    # to their "top" value. We then determine the max "top" value for each row.
    # Then we assign row numbers to the dataframe based on top values.
    row_max_tops = get_row_max_tops(img_df, distance_threshold)
    img_df["row_number"] = pd.Series([], dtype=object)
    for row_number, row_max_top in row_max_tops:
        if row_number > 0: lower_bound = row_max_tops[row_number - 1][1] + 1 # E.g. if the prior row has a max top of 50, the lower bound for the next row is 51
        else: lower_bound = 0
        upper_bound = row_max_top
        img_df.loc[img_df["top"].between(lower_bound, upper_bound), "row_number"] = row_number

    # Sort the dataframe by row number, left, and word_num so we can build table content logically.
    img_df.sort_values(["row_number", "left", "word_num"], inplace=True)

    # Build the table content.
    table_content = []
    for row_number in img_df["row_number"].unique():
        row_content = []
        cell_content = []
        for _, word in img_df[img_df["row_number"] == row_number].iterrows():
            if word["word_num"] == 1 and len(cell_content) > 0:
                row_content.append(" ".join(cell_content))
                cell_content = []
            cell_content.append(word["text"])
        row_content.append(" ".join(cell_content))
        table_content.append(row_content)

    # Convert the table content to a dataframe, and return it.
    return pd.DataFrame(table_content)
The result? Pretty good!
To extract table data from an image as a Pandas dataframe, now all you have to run is this:
img = "/path-to-your-image.jpg"
df = read(img)
Below is the output you’ll get for the toy table. As you can see, the approach works fairly well, though it puts the column headers one column too far to the left.
0  Column 1 header  Column 2 header  Column 3 header            None
1     Row 1 header   Row 1 column 1   Row 1 column 2  Row 1 column 3
2     Row 2 header   Row 2 column 1   Row 2 column 2  Row 2 column 3
3     Row 3 header   Row 3 column 1   Row 3 column 2  Row 3 column 3
4     Row 4 header   Row 4 column 1   Row 4 column 2  Row 4 column 3
5     Row 5 header   Row 5 column 1   Row 5 column 2  Row 5 column 3
6     Row 6 header   Row 6 column 1   Row 6 column 2  Row 6 column 3
Beyond the toy problem: How does it do in the real world?
In the real world, of course, tables aren’t as neat and tidy as the toy problem. And indeed, when I try this approach on dirtier inputs, the results are nowhere near as clean. But as proof of concepts go, I think this works pretty well and has the potential for further improvement. Maybe you have some additional ideas?
Download all the code
If you’d like to download this, try it yourself, and maybe further improve it, please download the code from this Gist.
PS: Thanks to PyImageSearch and Stack Overflow for some guidance as I worked through this problem.